Data filtering
In Action Plan, tables and lists are available in many places. Typically, the table header contains fields that allow you to filter the data by each column. The graphic below shows most of the typical filters as well as buttons for applying and deleting filters.
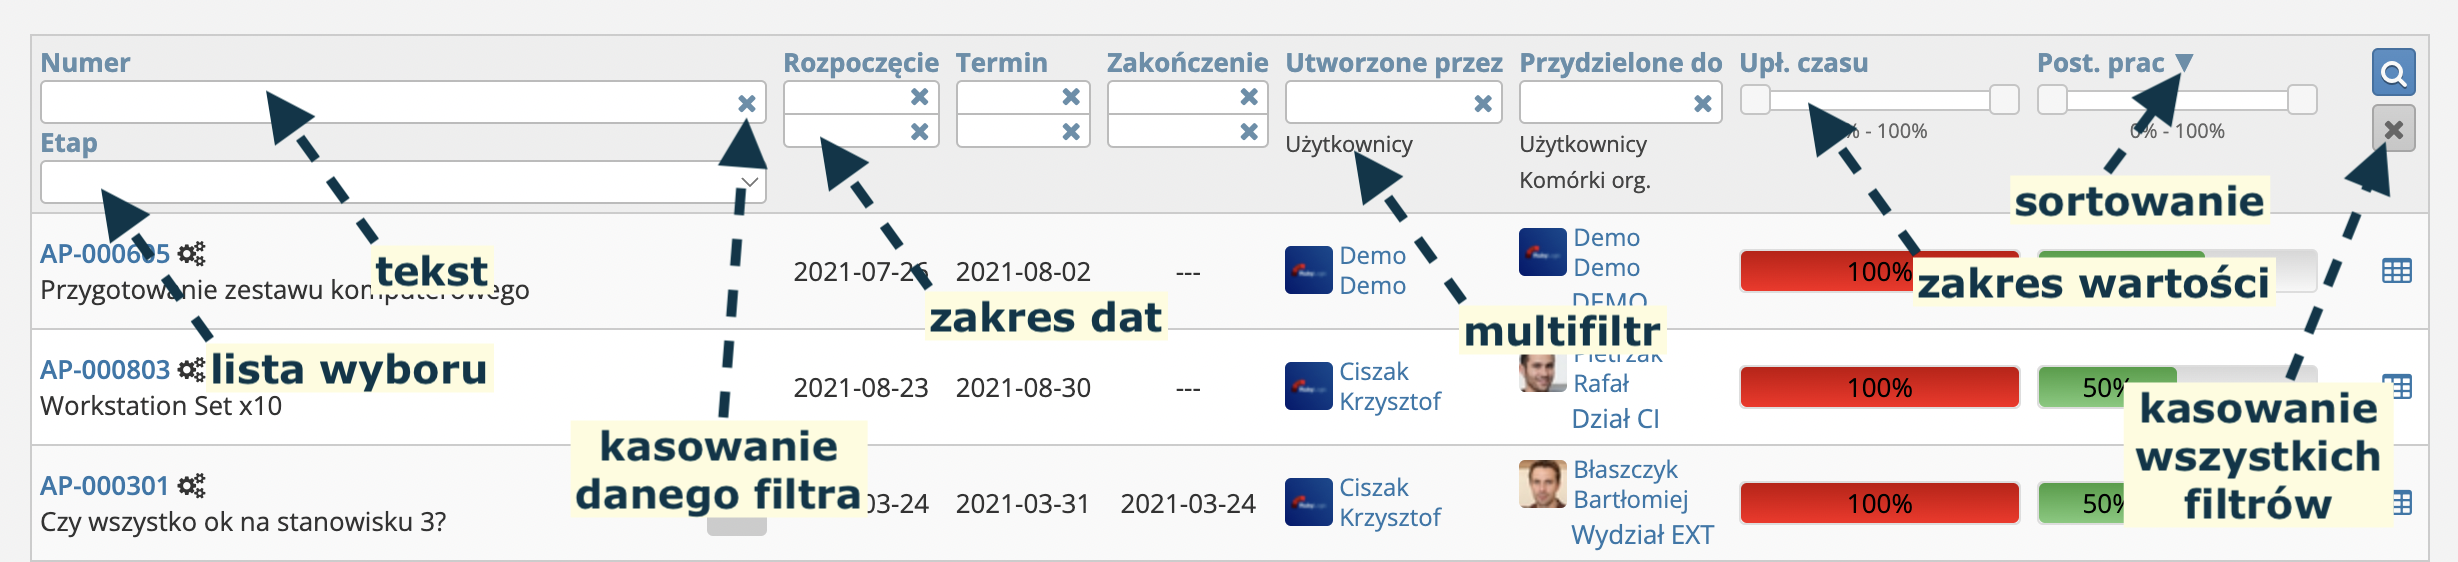
There is a logical operation "AND" between filters from different columns, i.e. after applying the filters, the table will show only the results that meet the condition from filter A AND filter B AND filter C AND ...
Sorting
In the Action Plan system, almost every filter name, e.g. "Number", "Due date", "Assigned to", is a link to sort the results by the selected column. The first click on a given text sets the sorting to ascending, which is visible by the appearance of an up arrow to the right of the text. Another click changes the sorting to descending - then a down arrow appears.
Each list also has a default sort, which sorts the results when you first enter a given collection or after clearing all filters.
Text filter
A filter in which the user enters the text they are looking for, or a fragment of it. It is not necessary to type the text from the beginning, because the system will find the given phrase regardless of where it is located. In addition, text will be searched regardless of the case in which the letters are.
For example, the phrase ant will be searched for in the following texts:
- Relevant action plans
- Anthology
- Study grant
Choice filter (dropdown)
A filter typically used to limit results to 1 option from a "short" dictionary of up to 20 items. The filter, in addition to dictionary options, also contains an empty option that allows you to clear the filter.
Multiple choice filter
A similar filter to the previous one, but with much more possibilities, is the multiple choice filter. It is usually used for longer dictionaries where the number of entries is difficult to predict, e.g. list of users or organizational structure cells.
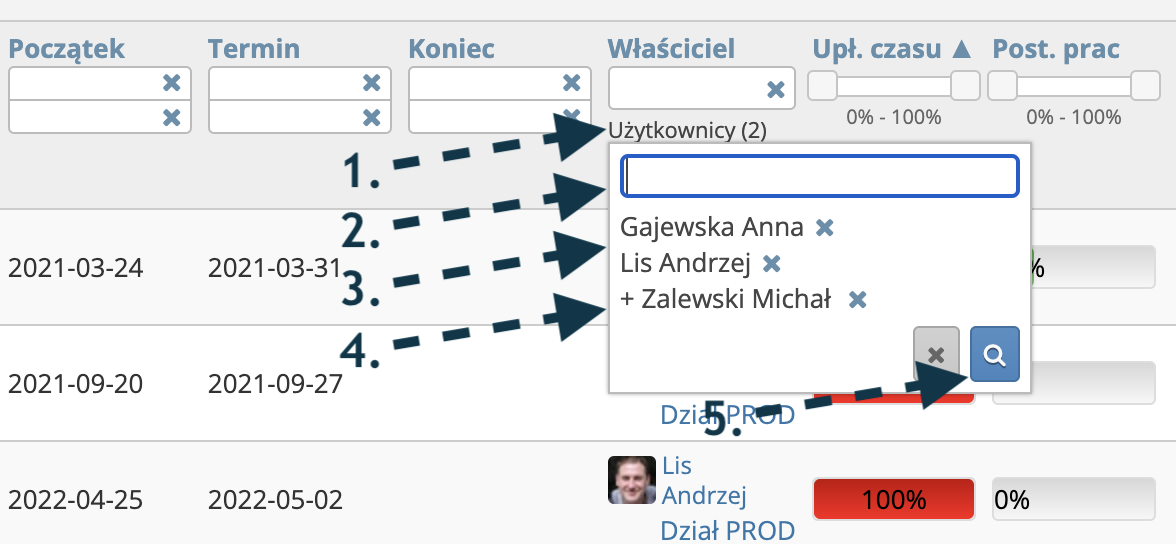
The filter is available in the window that appears after clicking on the text Users (X) or Org. cells (Y) (point 1 in the graphic). The window shows the entry search field (point 2 in the graphic), previously selected options (point 3 in the graphic) and options not yet applied (point 4 in the graphic). To apply the filter, click on the button with the magnifying glass icon marked with the number 5 in the graphic.
There is an additional option With subcells or Without subcells for multiple selection filters of organizational cells. Selecting this option will display results related to: the selected organizational unit and all subordinate ones, or only the selected organizational cell.
More information about the organizational structure can be found in here.
Date range filter
A filter that allows you to limit the results to a range of dates in 3 ways by entering a date in the YYYY-MM-DD format or selecting it from the calendar:
- by specifying only the date From (upper field) the results with the date greater than or equal to the given date will be displayed
- by specifying only the date To (bottom field) the results with the date lower or equal to the given date will be displayed
- by specifying both dates will display results with a date greater than or equal to the date From, and at the same time with a date less than or equal to the date To.
Value range filter
The value range filter comes in 2 forms. For percentages between 0 and 100, this is a slider with two tabs: the left tab sets the lower bound of the search range, and the right tab sets the upper bound.
For other numerical values, e.g. Number of logins to the system, the filter looks and behaves similarly to date range filter.
Filter application
Filters are applied (so-called autosubmit) after each change in the filter field, i.e. after pressing ENTER, TAB or after clicking outside the field area. If for some reason autosubmit does not happen, the user can apply selected filters manually by clicking on the magnifying glass icon, which is usually located on the right side.
The applied filters are saved in the database and do not need to be renewed each time you enter the list view.
Clear filters
It is possible to clean the filter in only 1 column or all at once. In order to clear 1 filter, click the X button in a given column. To delete all filters, click on the X icon on the right.
If for some reason you cannot enter the list, because the system returns an error, it is possible that it is related to the filters stored in the database, which are no longer available. Error 500 appears instead of the list, and therefore it is not possible to delete obsolete filters. In this case, adding the following string ?clear_filter=true to the URL may solve the problem.